I Cant Cut My Art on My Cricut All I Get Is a Square
Have you ever wanted to cut your own custom images or shapes for a projection on the Cricut? Simply like Cricut Print Then Cut images, existence able to cutting your own custom images and shapes opens up a whole new world of creating projects. By learning how to practise this you lot can create custom designs for simply virtually any project. This tutorial volition teach you lot how to cutting your own custom image or shape on a Cricut.
If you are looking for the Cricut Impress And then Cut feature, where you first print your image, then cut around the design, then bank check out this other tutorial correct here.
If you are looking to add together custom shapes, outlines, text, or other objects to your Cricut projection, so follow along with this tutorial. You can as well follow forth using the costless template image. Learn how to get it from my FREE resource library at the end of this mail service.
[Want to salvage this post to your Pinterest boards? Click here]
This post contains some affiliate links for your convenience (which means if you brand a buy subsequently clicking a link, I will earn a small committee to help keep my web log upwardly and running just information technology won't toll you a penny more). Click here to read my total disclosure policy.
Supplies Used for Cricut Print Then Cut
- Cardstock paper in whatsoever color of your selection
- Cricut Explore Air two (see my production review hither)
- Cricut standard grip cutting mat
- Autumn Foliage Template file for exercise (can be constitute in my Complimentary resource library – notice out more at the end of this post)
TIPS Before Showtime
- If uploading a JPEG, PNG, GIF, or BMP the shape or epitome volition be cut out equally a shadow and non as the full artwork piece if there are designs on it
- If you use a SVG file it will include the layers of the shape or image and cut out all parts of the artwork
- This tutorial is done from the Desktop version of Cricut Design Space. The app version for tablets may exist dissimilar.
What's the Deviation – Cut Your Own Image vs. Impress Then Cut Your Ain Paradigm
A Cut Your Own Image/Shape is where you have a simple blueprint that you lot desire to cut that already contains color layers or you simply want the outline or shape cut out in one color (every bit y'all'll see in this tutorial below).
A Print Then Cutting image is where y'all want to impress the verbal design and have the Cricut help you cut information technology out (seen in another tutorial).
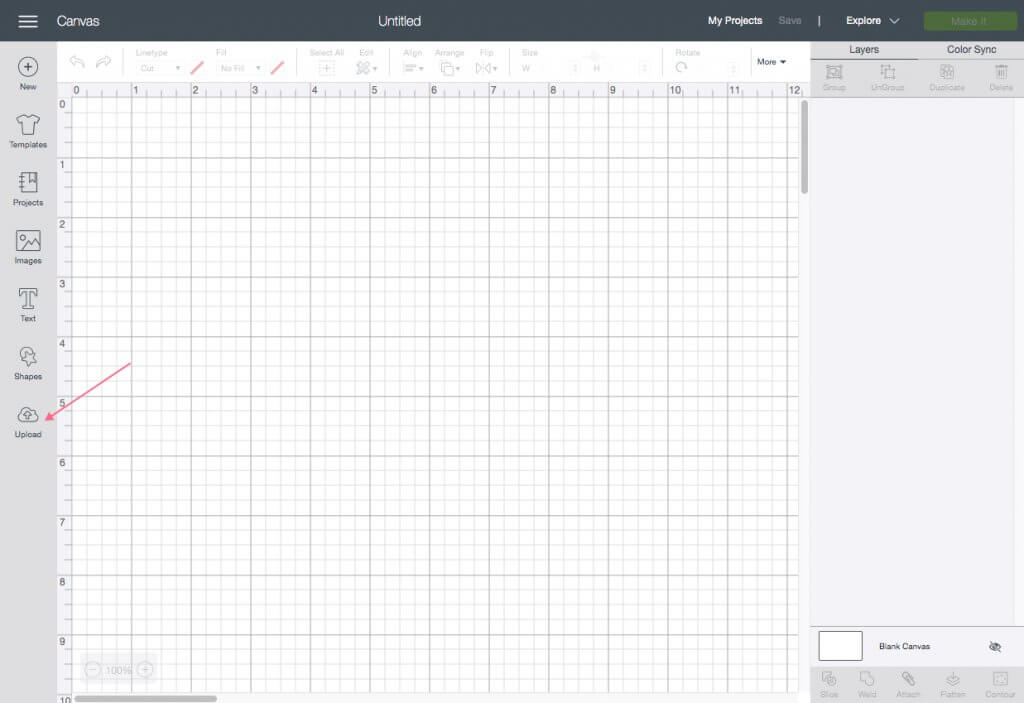
Pace ane – Import Your Custom Shape to Design Space
To import your custom shape, click on the UPLOAD button which is on the bottom of the left side toolbar in Cricut Design Infinite.
In the Upload section, y'all can cull to upload your own epitome or design fill. For now, we will focus on uploading an image. Click on UPLOAD Epitome under the Image section.

Side by side, you lot'll browse for your file using the Browse button or y'all can click and drag your file from your desktop or folder system directly into the "Drop file hither" surface area.

Images can be a JPEG, PNG, GIF, BMP, SVG, or DXF file. Typically if you detect an paradigm that is free on the spider web to use or you paid for it will come in the JPEG or PNG format. If you get any Cut files online from Etsy, Creative Market, or some other online web log like JenniferMaker, it will probable come in the SVG or DXF format. (Want to learn more about making your ain .svg files? JenniferMaker has an amazing course. You can sign up here to get on the waitlist if you want to learn more)
Step 2 – Select the Paradigm Type
Subsequently uploading your custom epitome, the prototype type needs to be selected. If it is simply an outline or an image with colors, but no shading then "Unproblematic" is the best. Choose "Complex" if the prototype has a lot of colors, shading, textures, backgrounds, and details. If information technology falls in the middle of those two with a little bit of shading, only a good contrasting background, then select "Moderately Circuitous".
For this Fall Leaf image I uploaded, I will select SIMPLE since information technology has a transparent background and the colors are simple and have no shading. Click Keep afterward you have selected your Paradigm Type. (This epitome I made is used as a shape to cut for the Thankful Fall Leaves Banner tutorial that you can discover here.)

Step three – Remove Unwanted Areas from the Custom Shape
Next, you will brainstorm to remove whatever whitespace or other areas that yous don't want printed and to help you lot form your image shape. This stride tells Cricut where to cut around the image. In this particular shape, I already accept a transparent background for the fall leaf, then you can see the checkered background.

Using another quick instance, the Christmas Tree Template from the Cricut Impress Then Cut tutorial, you tin meet there is a white background. Use the SELECT & ERASE tool that looks similar a magic wand. So click on the whitespace area that you lot want to "delete". If you make a mistake utilize the disengage push button, likewise as the zoom tools to fine tune whatever erasing. I don't bear on whatsoever of the Avant-garde Choice settings in this expanse.

Afterward using the "Select & Erase" magic wand, this is what the image looks like. The gray and blue checkered background indicates that it is "transparent" and only the epitome left.

Step four – Bank check Your Image Preview
As you are erasing any whitespace, you can too use the PREVIEW button to see what the outline of your shape will exist. This is helpful to be certain it looks right earlier finishing. Once you are satisfied with the Prototype Cutting format, click CONTINUE to accept the prototype shape.
Tip: If you miss whatsoever spots during the "Select & Erase" section, you will be able to remove them later on with a few different techniques. I talk more virtually fine tuning the object for cutting in step 8 and 9 beneath.

Step five – Choose Your Epitome Version and Relieve It
Now you volition need to choose how you desire to relieve the cut image y'all only Click on the first option that shows your image and says SAVE Equally A Cut IMAGE. You lot can also rename the image in the right side panel and add a clarification. Then click on SAVE. This step may take a infinitesimal to upload into the Cricut system.

Pace 6 – Insert Uploaded Epitome Into Your Projection
At present that you've successfully uploaded your custom prototype, select it from the Recently Uploaded Images section to add together it to your project. Click on the uploaded paradigm, and then click the INSERT IMAGES light-green push button at the bottom of the screen.

Step 7 – Size Your Image for Your Projection
It's time to size the prototype shape for your project. When the fall foliage template is added to a project, information technology is rather large. Then resize the image to start to approximately 6 inches broad.
Change the size of the leaf with the Size options in the toolbar menu at the meridian of Cricut Design Space. Or, you tin resize an image using the blueish arrow resizing button at the lesser right corner of the object.
Tip: The resize arrow push will automatically always brandish at the bottom right corner of any object.

Step 8 – Notice Tune the Image Before Cutting
If yous notice, in my uploaded paradigm, there are as well a couple of "blemishes" and missing areas that don't need to exist cut out on my epitome. To correct those missing spaces I could do a couple of things.
Beginning, I could zoom in and add basic small shapes over them, and then WELD the basic shapes to the sections that need to be filled in. For example, only in a higher place the bottom left leafage, I need to clean up a line. To do this, add a circle shape and resize it so that it covers the bare surface area. (Annotation: Zoom in to encounter the area close up).
Select both objects by clicking on both items and holding down the shift key. You tin select both from the layers panel on the right, or click and elevate on meridian of both items in the design area. Then click on the WELD button at the bottom of the layers panel. This will merge the ii layers together.

Step 9 – Contour the Image Shape
Another great style to fine tune the paradigm shape is to remove any tiny blemishes that may not be noticeable. The Profile feature is very helpful to remove any areas that you lot don't want to cutting. The original intention of the Contour feature is to be able to select the areas that you want to cut without having to delete them from the projection in case you change your mind.
When I click on the fall leaf and so click on Profile a window will open up. In this window all of the parts of the image show on the right side. Anything with a darker grey background when you lot click on it will not be cut. There is also a button that says HIDE ALL CONTOURS.
When clicked, it volition plough off all items with the exception of the autumn leaf main shape. Once all of the small items are selected (darker grey background highlight in the panel), click on the 10 button to close the window.

Notice at present, how the smaller spots that used to be on the shape are at present not showing. (TIP: Y'all may accept to use the zoom tool to notice.)

Step ten – Fourth dimension to Cut the Custom Shape
At present that the fall leafage is cleaned up and fix, duplicate information technology as many times as you for your project. (You tin do this Fall Leaf Thankful Banner tutorial using this exact leaf template.) One time you have the number of shapes yous want to cut for your project, you tin can click Brand It.

Organize the items on your mat inside a 11.5 x eleven.five square expanse for 12×12 paper and so they fit in the cutting area. You can then ATTACH them together and so they will stay in place to salve paper. You can observe out more about this in another tutorial I made for a Hack to Relieve Newspaper when using the Cricut.

Click CONTINUE and you volition be prompted with several options. Start select your Cricut device to be sure that it is connected. Then be sure your material is ready to CARDSTOCK.
Next, attach your newspaper to the standard greenish Cricut mat and bank check that my blade is in the proper clamp as noted on the screen. Once your mat prepped, load information technology into the Cricut and press the Cricut Go button on the Cricut auto.
Unload Your Mat and You're Done!
Now, unload your mat and check the cutting lines of your project. Peel the pieces off of your cutting mat carefully. Sometimes, if you lot turn your mat upside down and curl the mat, the paper will start to fold off. Doing this helps then that the paper doesn't curl.

Cricut Cut Custom Image or Shape feature

Become the Fall Foliage template to practise on your Cricut!
Follow along with this tutorial! To get the fall leaf template, sign up below to receive my weekly newsletter. As a bonus you'll gain access to my FREE resource library where the fall foliage template is stored. I am constantly adding more free printables, digital files, and paper crafting goodies simply for my subscribers.
Allow me know how you've used the Cricut Cutting a Custom Epitome or Shape feature. I always love seeing projects from other crafty friends. Tag me on Instagram or leave a comment below.
[Share this post on your Pinterest boards – click here]
Happy Crafting!

Source: https://www.craftyjulie.com/cricut-cut-custom-image/
0 Response to "I Cant Cut My Art on My Cricut All I Get Is a Square"
Post a Comment